What Is Pinch Pottery?
By Linda · · 7 min read
Pinch pottery is a hand-building technique where you shape a hollow vessel from a single ball of clay by pressing your thumb into the center and pinching the walls thinner between your thumb and fingers while rotating the piece. The result is a pinch pot, the oldest and simplest form of pottery. No wheel, no molds, no tools beyond your hands.
A “pinch pot” in ceramics simply means any vessel formed this way: small bowls, cups, planters, and sculptural forms all start as the same pinched ball of clay.
Pinch Pot Definition in Ceramics
If you need the textbook definition: a pinch pot is a vessel formed by manually pinching and thinning the walls of a solid ball of clay, working from a central thumb depression outward and upward.
Pinch pottery is one of the three core hand-building methods, alongside coil building and slab construction. Many potters, myself included, learned to “feel” clay through pinching before ever touching a wheel. It teaches wall thickness, moisture control, and clay memory better than any other exercise.
The History of Pinch Pots
Pinching is almost certainly the first pottery technique humans ever used. The earliest known ceramic vessels, found in East Asia and dated to roughly 18,000–20,000 years ago, were hand-formed without a wheel. Pinching is the most direct way to turn a lump of clay into a container.
A few highlights from the long history of pinch pottery:
- Prehistoric cooking and storage vessels across Asia, Africa, the Americas, and Europe were pinched or pinched-and-coiled long before the potter’s wheel appeared (the wheel arrived thousands of years later, around 3,000–4,000 BCE in Mesopotamia).
- Jōmon pottery in Japan, among the oldest ceramic traditions in the world, relied on hand-forming. Japan later elevated the pinched tea bowl (chawan) into a high art form associated with the tea ceremony and wabi-sabi aesthetics.
- Native American pottery traditions, including Pueblo pottery of the Southwest, began vessels with pinched bases that were built up with coils.
- Contemporary studio potters still make pinch pots deliberately, prizing the slightly irregular, organic forms and visible fingermarks that a wheel can’t produce.
So when you pinch a pot, you’re using the exact technique the first potters used. Nothing about it has fundamentally changed in many thousands of years.
How to Make a Pinch Pot, Step by Step
1. Prepare the Clay
Wedge (knead) the clay to remove air bubbles and even out the moisture. Air pockets can cause cracks or blowouts in the kiln.
Roll a ball roughly the size of an orange. About 1 pound (450 g) of clay makes a comfortable first bowl. Bigger than that gets hard to control.
2. Open the Form
Hold the ball in your non-dominant palm and press your thumb straight into the center, stopping about 1/2 inch (1.3 cm) from the bottom. That remaining clay becomes your base, so don’t pierce through it.
3. Pinch and Rotate
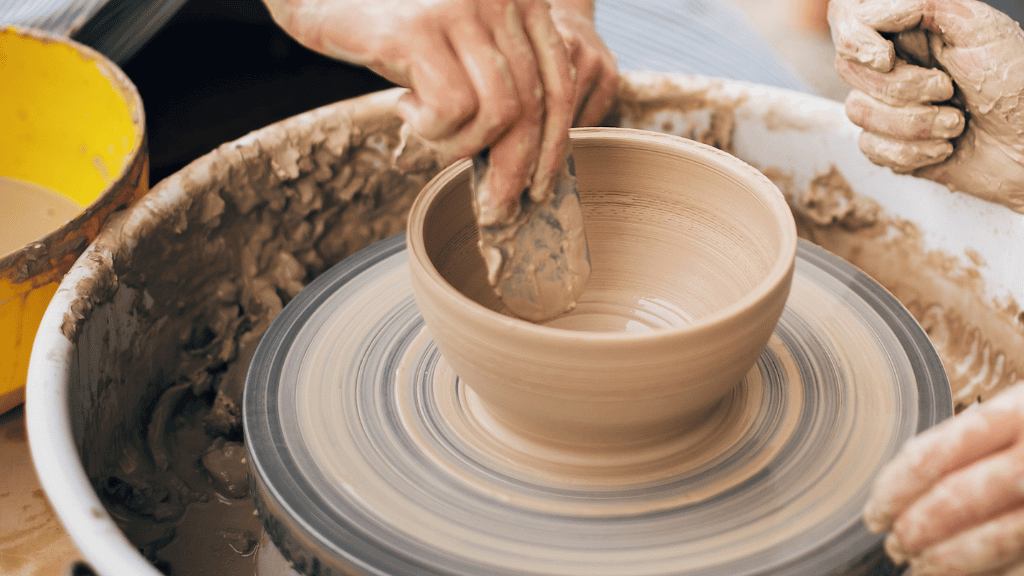
Pinch the wall gently between your thumb (inside) and fingers (outside), then rotate the pot slightly and pinch again. Small, even pinches in a spiral from the bottom upward work far better than big aggressive squeezes.
Aim for walls about 1/4 inch (6 mm) thick. Even thickness matters more than thinness. Support the outside with your palm as you work so the form doesn’t flare out of control.
4. Refine the Rim and Surface
If the rim cracks, dampen it lightly and compress it between your fingers. A rim left ragged will crack further as it dries.
Smooth the surface with a damp finger, a rib, or the back of a spoon, or leave the fingermarks. They’re part of the charm of pinch pottery.
Pinch Pottery vs. Other Hand-Building Methods
Here’s how pinching compares to the other ways of forming pottery:
| Method | How It Works | Best For | Difficulty |
|---|---|---|---|
| Pinch | Thin a ball of clay between thumb and fingers | Small bowls, cups, organic forms | Easiest |
| Coil | Stack and blend rolled ropes of clay | Tall or large vessels | Easy–moderate |
| Slab | Cut and join rolled-flat sheets | Boxes, plates, angular forms | Moderate |
| Wheel throwing | Shape spinning clay on a potter’s wheel | Symmetrical, repeatable forms | Hardest to learn |
The methods combine well. A pinched base with coiled walls is how potters built large vessels for millennia, and many sculptors join several pinch pots to make hollow animal forms or teapot bodies.
Texture, Decoration, and Attachments
Once the basic form is established, personalize it while the clay is still soft or leather-hard:
- Impressed texture: press a fork, toothpick, shell, leaf, lace, or stamp into the damp surface.
- Colored slip: brush or trail liquid clay in contrasting colors before the bisque firing.
- Burnishing: rub the leather-hard surface with the back of a spoon or a smooth stone for a soft sheen without glaze.
To add handles, feet, or a spout, score (scratch) both surfaces, apply slip to each, press them together firmly, and blend the seam. Skipping the score-and-slip step is the number one reason attachments pop off during drying or firing.
Drying, Firing, and Glazing a Pinch Pot
Let the pot dry slowly and evenly. Fast, uneven drying is what cracks pinch pots. Cover it loosely with plastic for the first day or two, keep it out of direct sun, and expect roughly 5–10 days to reach bone dry depending on thickness and humidity.
Firing follows the same schedule as any other pottery. A typical sequence:
- Bisque firing to cone 06–04, about 1,828–1,945°F (998–1,063°C), which hardens the clay so it can be glazed. I cover what that stage produces in what is bisque pottery.
- Glaze firing to the clay’s maturity: cone 06–04 for earthenware, or cone 5–6, about 2,167–2,232°F (1,186–1,222°C), for stoneware.
Choose a pottery glaze rated for the same cone as your clay body, and glaze any pot meant to hold food or liquid. See my guide to glazed pottery for why that matters.
No kiln at home? Many studios and community centers fire pieces for a few dollars per pot, and I’ve written about your options in do you need a kiln for pottery.
Common Pinch Pot Problems (and Fixes)
- Walls flare out into a pancake: you’re pinching too low and too hard. Work in small pinches from the bottom up, and let a floppy pot stiffen for 15–20 minutes before continuing.
- Cracked rim: the rim dried out while you worked. Compress it early and often, and keep it lightly damp.
- Thick, heavy bottom: almost everyone’s first pinch pot has one. Press your thumb deeper at the opening stage, or trim excess at leather-hard.
- Cracks during drying: uneven wall thickness or fast drying. Slow the drying under loose plastic.
- Sticky, slumping clay: too much water. Use damp fingers, not wet ones, and walk away for a few minutes if the clay gets mushy.
Why Pinch Pots Are the Perfect Teaching Tool
Pinch pottery is the standard first project in school art rooms and beginner classes for good reason: it needs no equipment, succeeds on the first try, and teaches the fundamentals (moisture control, wall thickness, scoring and slipping) that every other technique builds on.
It’s also genuinely cheap to try. A 25-pound bag of clay runs roughly $15–$30 and makes about 25 small pinch pots, so a classroom or a curious beginner can experiment freely without worrying about wasted material.
For kids or anyone without kiln access, the same pinching technique works with air-dry clay and oven-cure polymer clay, though only kiln-fired clay produces durable, food-safe pottery.
FAQ: Pinch Pottery
What is a pinch pot?
A pinch pot is a vessel made by pressing your thumb into a ball of clay and pinching the walls between your thumb and fingers while rotating the piece until a hollow form takes shape. It’s the simplest pottery technique and the usual starting point for beginners.
What is the history of pinch pots?
Pinching is the oldest pottery technique known. The earliest ceramic vessels, dated to roughly 18,000–20,000 years ago in East Asia, were hand-formed, and cultures worldwide, from Jōmon Japan to the Pueblo peoples of the American Southwest, built their pottery traditions on pinched and coiled forms long before the potter’s wheel existed.
What type of clay is best for pinch pottery?
A smooth, plastic clay body works best. Earthenware and mid-range stoneware are both forgiving choices; heavily grogged sculpture clay is rougher on fingertips during long pinching sessions. Air-dry and polymer clay also work if you don’t have kiln access.
How long does a pinch pot take to dry before firing?
Typically 5–10 days to reach bone dry, depending on wall thickness, size, and humidity. Dry it slowly under loose plastic at first. A pot with any remaining moisture can crack or even burst in the kiln.
How do I keep my pinch pot from cracking?
Keep the wall thickness even (about 1/4 inch / 6 mm), compress the rim as you work, and dry the piece slowly away from sun and heat vents. Most cracks trace back to uneven walls or rushed drying, not the firing itself.
Do pinch pots need to be glazed?
Only if they’ll hold food or liquid — glaze seals the porous clay surface. Decorative pinch pots can be left unglazed, burnished, or finished with slip, underglaze, stains, or oxides for color without a glossy coat.